
research
How to run CENSUS masked AES on your target board
By Cesca LabThis blog post has been written by Lisanne Weidmann, while she was doing her internship here at the CESCA lab.
In this blog post, we will explain how to run the CENSUS masked AES implementation on an ATMEGA- and STM32 microcontroller. CENSUS is a side-channel resistant AES implementation that uses masking techniques to protect against power analysis attacks. By following the steps outlined below, you will be able to set up and execute the CENSUS masked AES on your STM32 Cortex-M4 chip.
Step 1:
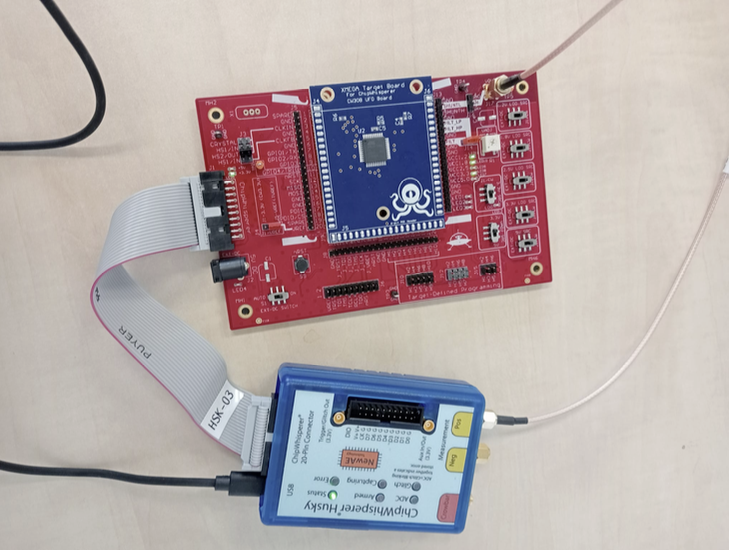
ATMEGA
In order to run the CENSUS masked AES implementation on your ATMEGA chip, you will need to set up the hardware environment. This includes:
- ATMEGA as your target board
- ChipWhisperer CW308 adapter
- ChipWhisperer Husky for collecting the traces
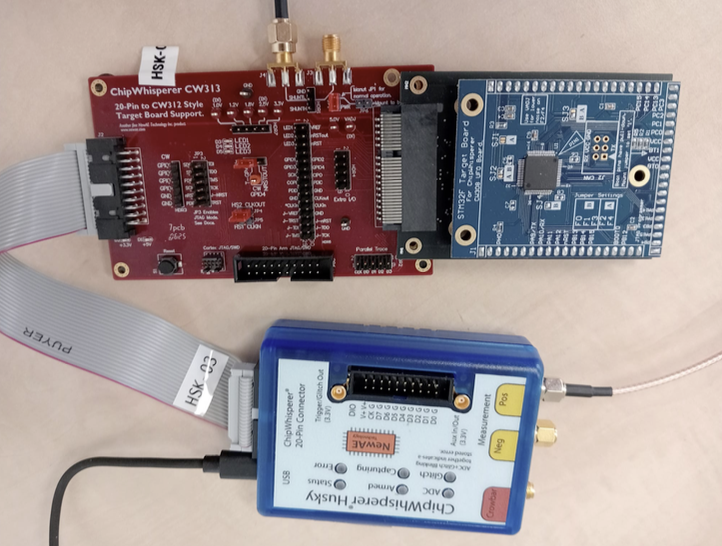
STM32 Cortex-M4
In order to run the CENSUS masked AES implementation on your STM32 Cortex M4 chip, you will need to set up the hardware environment. This includes:
- STM32 Cortex-M4 as your target board
- ChipWhisperer CW313 adapter
- ChipWhisperer Husky for collecting the traces
Step 2: Software setup
Basic setup
Now we are going to set up the software environment to run the CENSUS masked AES implementation on your desired chip. First make sure that you have a working Chipwhisperer installation. You can follow the instructions on the Chipwhisperer website to install the necessary software and drivers: Link to Chipwhisperer Installation Guide
Now, we are going to clone the Github repository that contains the CENSUS masked AES implementation and the necessary scripts to run it. You can do this by cloning the following repository: Link to CENSUS masked AES repository.
In the next steps we will make alterations to the codebase such that we can run the desired functions on our target boards.
Creating the makefile
All files described can be found here: Link to autoencoder-demasker repository
We will start off with the makefile that is provided in the repository. We have to define the compiler and the flags that we want to use. For the compiler, you have to pay attention to the target board you are using:
- For STM32 Cortex-M4 target board, use the arm-none-eabi-gcc compiler.
- For ATMEGA target board, use the avr-gcc compiler.
For example, if you want use the STM32 Cortex-M4 target board, you have to define the following in the makefile: PREFIX=arm-none-eabi
The defined flags in the makefile can stay the same for both targets. Furthermore, we specify the TARGET name, which is what our output file will be called. We set SS_VER to SS_VER_2_1, in order to use SimpleSerial version 2.1. We can set the cryptotarget to NONE, and the PLATFORM to one of the options described in the chipwhisperer documentation: Link to Chipwhisperer Target Defines
Finally, we include the makefiles for SimpleSerial and our firmware:
include /home/user/chipwhisperer/firmware/mcu/simpleserial/Makefile.simpleserial
FIRMWAREPATH = /home/user/chipwhisperer/firmware/mcu/include$(FIRMWAREPATH)/Makefile.inc
Creating the main file
Next, we will create the main file that will call the functions from aes.c to run the CENSUS masked AES implementation. We first have to include the relevant libraries: stdio.h, string.h, stdint.h, aes.h and simpleserial.h. If we are working with the STM32 Cortex-M4 target board, we also have to include the library hal.h, otherwise when using the ATMEGA target board, we have to include avr/io.h, xmega_hal.h, and avr_hal.h.
If we are running the STM32, we also have to declare the trigger functions trigger_high() and trigger_low(). This is not needed when running on ATMEGA.
We specify a test_aes function that takes a command, a subcommand, a command length, and a buffer. The buffer will contain the key, plaintext, and the initial masks in that exact order. We will extract these values from the buffer, define the AES context, and call the AES encryption function. After encryption, we append the buffer with the received ciphertext, the output masks. Finally, we send the buffer back using the simpleserial_put function.
In the main function, we first initialize the hardware using platform_init() and uart_init(). Then, we set up the SimpleSerial commands using simpleserial_addcmd. We add the command 'a' for encryption, specify the length of the input buffer, and the name of the function attached to this command. Finally, we enter an infinite loop where we call simpleserial_get() to wait for incoming commands.
Changing aes.c
In the original implementation, the masks are initialized within the aes.c file with a fixed seed. Although this may be useful for testing purposes, it does not make for random masks. Therefore, we will modify the code such that the masks are provided as input.
We will comment out the mask initialization from the aes.c file, and make sure to alter the function signature such that the masks are always supplied as input parameters for the relevant functions. Example:
// Original function signaturestatic void CipherMasked(state_t *state, const uint8_t*RoundKey)
// Modified function signaturestatic void CipherMasked(state_t *state, const uint8_t* RoundKey, uint8_t *mask)
When you make these changes, be sure to also change the signatures of the AES_mode_encrypt function in aes.h. Example:
// Original functionsignature void AES_ECB_encrypt(const struct AES_ctx* ctx, uint8_t*buf);
// Modified function signaturevoid AES_ECB_encrypt(const struct AES_ctx ctx, uint8_t buf, uint8_t* mask);
Step 3: Compiling the code and capturing traces
After making the necessary changes to the makefile, main file, and aes.c file, we can now compile the code. Import chipwhisperer as cw, and specify the scope. Afterwards we can build the firmware. Specify SCOPETYPE = 'OPENADC', and set the CRYPTOTARGET and PLATFORM variables to the same values as in the makefile. Then execute the following lines of code:
%%bash -s "SS_VER" "$PLATFORM" "$CRYPTO_TARGET"# cd /{adress to the chipwhisperer directory}/hardware/victims/firmware/simpleserial-aescd /home/lisanne/autoencoder-demasker/census-masked-aes/src/make -f makefile
This will generate a .hex file that can be flashed onto the target board using cw.program_target(scope, programmer, fw_path). Make sure to run the generic setup code for Chipwhisperer before flashing the target.
Once the target is flashed, we can start capturing traces. We generate the masks, key, and plaintexts using numpy's random integer function, and store them into a buffer. We start the capture loop, each time arming the scope, sending the buffer to the target using target.simpleserial_write('a', payload), and then capturing the trace using scope.capture(). We read the outputted values (ciphertext and output masks) using target.simpleserial_read('r', 58).
Note: For ATMEGA, set the sample size to 40500, for STM32 set it to 51561. You can use DWT_CYCCNT to measure the execution time of your code. If you do, you can append the output buffer to include these measurements such that you can read them out later.
And that's it! You have successfully set up and run the CENSUS masked AES implementation! Below you can see example of what an ATMEGA and STM32 trace looks like:
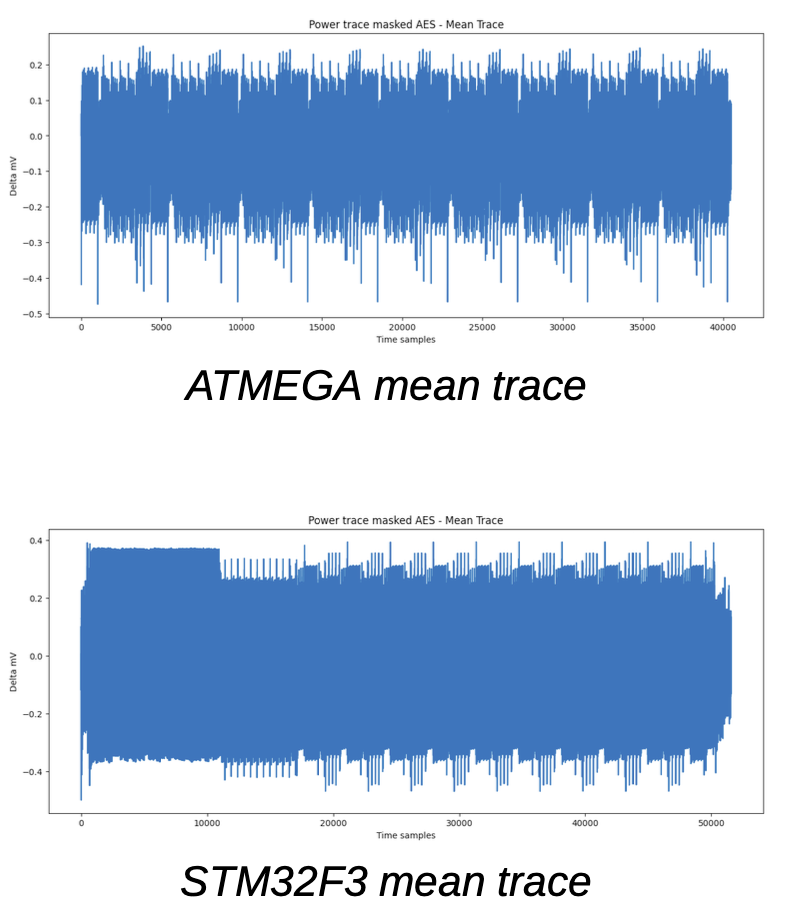
Further information about the traces and the masking is described in `Towards mask-removing autoencoders`. If you have any questions or run into any issues, feel free to reach out to Lisanne Weidmann. Happy capturing!